Installing NOS
Courtesy of Brian
This has got to be one of, if not, the easiest and cheapest way to get big power gains from any engine. Below you are going to find detailed instructions on how to add anywhere from 50-160hp to your ZX2. Now there are a few precautions I would like to inform you of before you begin the installation.
Running anything over a 110hp shot I strongly suggest the use of the ARP rod bolts. These rod bolts are available through South County Motorsports and usually run around $89.
I have found that the main weak link in the bottom end 2.0L 4cyl ZETEC engine is rod bolts. I can tell you from experience that it is true. When I first heard that I thought naaa I am only going to be running a 75hp shot I don't need rod bolts. Well come to find out while in a hurry I accidentaly reversed the jets and ended up running a 160hp shot on the stock engine. Well in case you haven't guessed it buy now I ended up breaking a rod bolt and that sent the rod and piston slinging right out the side of the engine. For those new, THIS IS NOT GOOD
Take precautions, and by this I mean don't go crazy with the NOS only use it at the track or at a designated race location. And even though I have competed in street races I do not promote them. It is dangerous, and stupid but for some reason it keeps us coming back.
Use gauges and an aux. cut off switch. By this I mean don't rely just on the full throttle micro switchthat NOS supplies. Because in the event you start to run lean you will be able to cut it off and not take a chance of blowing your engine. Also the use of either a fuel pressure gauge or an Air/Fuel mixture gauge I strongly suggest.
Ok I guess we are just about ready to get started. Just about everything that you are going to need to install the nos is included in the kit. And the KIT that I am going to explain how to install is a generic dry manifold kit from NOS, nitrous oxide systems. The kit number is 5122. Now this kit does not have the solenoids assmbled and for that you can read the instructions. From this point on you would be surprised at how easy it is to install nitrous on your ZX2.
First step you need to do is to mount the solenoids. There are several locations to mount the solenoids so depending on your preference you decide where you want it mounted. Keep in mind however that the steel braided line CAN NOT be bent, and by bent I mean don't try to make a sharp 90º turn. Doing so will result in breaking of the internal seal and therefor resulting in you having to replace the line, and believe me they are not cheap.
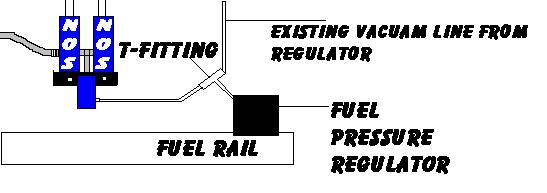
Once the solenoids are mounted next step would be to run the 16' nitrous line. This is the line that connects the bottle to the solenoid. Now remeber to use either teflon tape or teflon paste when sealing this connection. If this is not connected tightly enough when the bottle is opened the nitrous will leak out. DO NOT open the bottle till the entire installation is complete. The next step would be to connect the T-fitting to the Vacuam line of the fuel pressure regulator. The fuel pressure regulator can be found on the fuel rail, for those who do not know where his is it is the chrome tube right above the valve cover. It is a Black box, sort of, well it looks like a block with electrical wires on top of it. Now on the back of the fuel pressure regulator there is a thin black tube that points torwards the firewall. This is where the t fitting goes. Below I have drawn a terrible but legible drawing of how the t fitting should be inserted
Now that the t fitting is installed your next step would be to mount the spray nozzle. This should be mounted about 6-8" from the throttle body for proper atomization. If you are still using a factory intake my suggestion to use is to replace the resonator piece that is connected to the elbow fitting with a straight pipe. Once that is done all that is necesarry is to drill a hole and mount the nozzle.
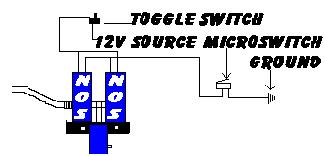
Now comes a sort of tricky part of the installation, mounting the full throttle switch. There are several ways of doing this so you have to find which is the easiest way for you. The easiest I have found has been removing the small gold phillips head screw near the fuel rail and mounting the bracket there. Below I have made a wiring diagram of how everything should be wired up.
Once this is done the only step left would be to connect either a fuel pressure or a air fuel mixture gauge so that you can monitor the fuel mixture or fuel pressure. After the gauge or gauges are mounted all you need to do is turn the bottle on, and go out and have some Honda for lunch.